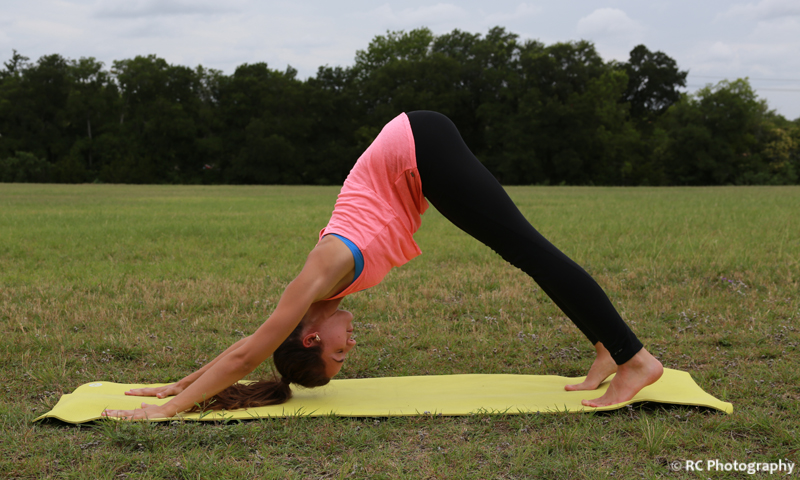
Many of us know that yoga can be very restorative. It can help strengthen our muscles, increase flexibility, teach us to focus on breathing, stretch out tight areas, and relieve both physical and mental stress. I’ve seen a few articles that claim to outline some of the best yoga poses for climbers, but most of them are not all that specific to climbing. So, when I met Lydia Jarjoura, a dedicated yogi and lover of the outdoors, I asked her to create her own list of climbing-specific yoga poses, and outlined below is her yoga for climbing masterpiece. Photos of Lydia were taken by Richard Casteel and are subject to copyright laws. Thanks RC!
Top 7 Yoga Poses for Climbers
There are thousands upon thousands of different yoga postures. Each “asana” (posture) has a purpose; learning what types of poses are good for your body can fundamentally change your yoga practice (or help you start one)!
Like pulling on a rope, your body holds on to certain muscles more than others. Most of these areas of tightness are in the areas that climbers use the most; wrists, forearms, shoulders, hips and legs. Yoga can help release this muscle tension and act as a great complement to climbing.
-
Seated Forward Fold
https://www.climbhealthy.com/wp-content/uploads/Seated-Forward-Fold.jpgA great warm-up posture and hamstring stretch is Janushirsasana or head-to-knee pose. Despite the name of this posture, the goal isn’t necessarily to touch your head to your knee; that may come over time, but in the beginning, just work on lengthening your spine. Start in a seated position with both legs extended out in front. Bend your right knee and pull your heel as close to your groin as you can. Inhale to sit up tall as you externally rotate your right knee, towards the ground. Engage the muscles in your left leg by flexing your left foot; imagine that you’re standing on that foot. Square your chest over your extended left leg and inhale as you reach your sternum forward and up and as you exhale, slowly and gently hinge forward at your hips. Continue to inhale as you lengthen your spine and exhale as you work on hinging forward, with a straight spine. Repeat on the left side.
-
Fish
http://www.climbhealthy.com/wp-content/uploads/slideshow-gallery/IMG_2447.JPGA great posture for opening up the chest and combatting the climber’s hunchback is Matsyasana, or fish pose. There are different modifications for this, depending on how loose or tight your chest feels. Start by lying down on your back with legs extended out in front, muscles flexed, and feet together. As you inhale, press your elbows into the mat so much so that your chest lifts up so that you can place the top of your head on the mat. From here, press your palms firmly into the mat and lift your elbows by straightening your arms. This movement tucks your shoulder blades together on your back and increases the opening in your chest. Most of the pressure should be on your hands and legs so your neck and head shouldn’t feel stressed. Once you are situated, see where your body wants to go. If this is too intense, you can always support yourself by placing a rolled towel vertically under your chest to get the same effect.
-
Child's Pose
http://www.climbhealthy.com/wp-content/uploads/slideshow-gallery/IMG_2468.JPGChild’s pose, or balasana, is a resting posture. It stretches the lower back as well as the hips, thighs, knees and ankles. It helps to relax the spine, shoulders and neck – common problem areas for climbers. Child’s pose is great for most everyone but should be avoided if you have any knee or ankle problems like cartilage or ligament tears. Starting on hands and knees, lower your hips back towards your heels so that your shins rest on the mat. Untuck your toes and fold your torso over your thighs. Lay your arms down at your sides with your palms face up. Rest your forehead gently on the mat. Stay in this posture for as long as is comfortable.
-
Pigeon: Step 1
http://www.climbhealthy.com/wp-content/uploads/slideshow-gallery/IMG_2453.JPGAn intense but extremely helpful posture for climbers is Pigeon Pose or Eka Pada Rajakapotasana. It releases both physical and emotional tension and most students feel the benefits immediately after. Pigeon stretches the hip rotators (near the buttocks) and the hip flexors (the long muscle that runs along the front of your thighs and pelvis). In the beginning, it may be nearly impossible to get into this posture comfortably, but if you practice it regularly you’ll notice increased flexibility and release in your hips and groin, making it easier to high-step while climbing. Start on hands and knees, then lift your left leg up behind you. Next, swing it forward to place your left ankle behind your right wrist. You may need to bring your left ankle really close to your groin at first. Make sure that your left knee is to the outside of your left hand; you want it rotating open, towards the side. You want your hips to be square, so be aware that you’re not rolling over onto your left buttock. It helps to place a folded blanket underneath your left side. Come up onto your hands and imagine trying to pull your thighs together.
-
Pigeon: Step 2
http://www.climbhealthy.com/wp-content/uploads/slideshow-gallery/IMG_2455.JPGOnce you feel this almost lifting sensation, you can slowly lower down onto your forearms, working towards lowering your forehead to the mat. Rest in this position as long as you see fit and repeat on the left side. Slowly move out of the pose if you notice your circulation cutting off or sharp pain.
-
Downward Facing Dog
http://www.climbhealthy.com/wp-content/uploads/slideshow-gallery/IMG_2441.JPGLook down at your hands and wrists. Without their strength, you wouldn’t be able to do much. Downward Facing Dog or Adho Mukha Svanasana, is one of the most beneficial postures for so many reasons. It stretches and strengthens your body from your head down to your feet. Start on hands and knees. Press your hands into the mat to come to a plank, or push up posture. Without moving your hands or feet, lift your hips up and back towards the ceiling. In the beginning, you may want to pedal your feet up and down, loosening up the hamstrings. Heels don’t need to be touching the mat. Bend your knees deeply, hike your tailbone up even higher and straighten the legs as much as possible. Look down towards your knees, letting your head hang heavy. Zip your ribs up, making sure that they are splaying out towards your legs. Take a slight bend in your elbows; notice the difference of using your strength to support you instead of your joints. Engage your leg muscles; downward dog is all about the legs and you should feel most of the weight lifting out of your legs up into your hips.
-
Half Moon
http://www.climbhealthy.com/wp-content/uploads/slideshow-gallery/IMG_2464.JPGArdha Chandrasana or Half Moon Pose is a therapeutic posture that improves your balance and full-body coordination. Postures like this can help increase your body awareness and give you greater stability while climbing. Start by standing in a forward fold (feet are a few inches apart and your torso is hanging down over your hips). Bend your knees enough so that you can place your fingertips down in front of you. Lift your left leg up behind you. Keep right knee bent slightly. Open up your left hip (you can do this flat against a wall to really feel the hip open up) and imagine stacking it over your right hip. Press firmly into your right hand (or place your hand on a block) as you lift your left leg higher. Extend your left arm up, fingertips reaching towards the sky. If you are comfortable here, take your gaze up to your left hand. Draw your shoulder blades down your back, making plenty of space from your ears to your shoulders. To release, fold your left hip back down to be square with your right and gently lower your leg. Repeat on the opposite side.
-
Eagle
https://www.climbhealthy.com/wp-content/uploads/IMG_2459.jpgOne last posture for grounding and awareness is Eagle pose, or Garudasana. This posture helps loosen the hips, wrists and shoulders, while building strength in the legs. Garudasana teaches the student to go with the flow. Some days it’s hard to balance while some days you may feel like you could hold Eagle for hours. Either way, it’s a great lesson in releasing tension and finding stability in any situation. Start out standing and bend into your right knee. Slowly lift your left foot and wrap your left thigh around your right thigh. You can place the left toes on the ground as a kickstand, or you can wrap them around your ankle. Bend a little lower for more balance. Extend your arms out in front of you and cross your left arm over your right. Bend your elbows so your fingertips reach towards the ceiling. Try to wrap your left hand to the inside of your right palm. Pull your elbows in to your chest and your shoulder blades down your back. Repeat on the opposite side. Remember: if you fall out, get right back into it!
Written by Lydia Jarjoura
This is great, I find all of the advice given very helpful. These techniques definitely make me feel better, not during or even after, but the next day I feel so relaxed and loose. One thing missing here is the amount of time that should be spent in each position and how much pain is too much pain, as you know most of these positions can be painful, but a good pain, not structurally or muscle damaging.